2 days in Zion National Park With this comprehensive guide, you’ll know the best hikes in Zion National Park to visit its most beautiful views and all your planning needs for a successful trip.
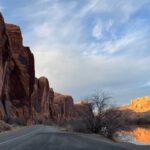
The tall red cliffs, magnificent canyon views and sparkling green waters of the Virgin River in Zion National Park. The park only stretches 15miles, but there is a lot to see and interesting trails that you can do. Zion is the third most visited National Park in the U.S., attracting over 5 million visitors each year, so it’s no wonder.
Just a highlight on any Utah National Parks road trip, it also happens to be near other gems like Bryce Canyon which make Zion one of the ones you must visit. Set in the heart of Utah’s desert country, Zion is a National Park with countless bucket list worthy experiences and 2 days in Zion will give you a taste of all that it has to offer. You will miss things, but most likely head away already searching for a way back.
The first time I went to Zion, it was the Zion Half Marathon and I fell in love. Every time I return here, it leaves me just as awestruck with each open turn providing fantastic scenery. If the dreaded Zion shutdown does happen to fall on that weekend, call us here at locally owned and operated Defined Sight for assistance with lodging options if you need to extend your stay. but hey great news is we planned out everything for a perfect itinerary in order provide you every tip needed as far as top hikes/scenic stops/and practical expert advice!
Essential Tips for Your 2 Days in Zion National Park
- Zion National Park Entrance Fees Gate Fee: $35 per vehicle, good for up to 7 days. The America the Beautiful pass is worth snagging if you plan on hitting up a few National Parks during your Utah road trip. For $80/year, it gives you access to all National Parks and most Recreation Areas which is a good option for anyone going to at least 3 parks in the year
- Passes: In 2024, there are no longer any reservations required to enter Zion or catch the shuttle system.
- Zion Shuttle: Private vehicles are prohibited on Zion Canyon Scenic Drive for much of the year (March 3-December 1,2024). Instead, visitors to the park utilize a shuttle system — it runs fairly frequently (5-15 minutes) and stops both within Zion as well nearby Springdale. Plan enough time for travel — it will take you about 45 minutes to get from the Visitors Center all the way around to where The Riverside Walk ends at Temple of Sinawava. You do not want to miss that last shuttle!
- Hiking: If you plan on hiking in Zion (there are many highlights that your feet will take to), make sure put some miles down before going. Itinerary (2 DAYS) — Most days you are going to walk a lot, so wear comfortable shoes.
- Permits: Required beyond Scout’s Lookout (location of chains) for Angels Landing There is a daily and annual lottery. They also require permits for the Narrows and Subway hikes starting upriver, but I doubt those would work in a 2-day trip anyways.
- But Remember, Early Starts Matter: Zion is a popular park so plan to arrive early in the day rather than later. Get an early start to avoid larger crowds, especially on the busier trails. The Visitors center parking also fills up quickly, starting early is important
- Weather and Flash Flooding: Zion is a flash flood-prone environment with frequent thunderstorms (especially in summer) Check the weather and water levels before you go. Do not hike during a storm, as conditions can change rapidly and river edge trails are particularly unsafe.
- Check trail status: Keep track of the state — considering diversions and closures that can result from water, rockfalls or cyanobacteria — before you go. Informing yourself will protect you from disappointment.
- No Cell Service: Zion has poor reception, so download the maps in advance The signal is at its strongest by the Visitors Center.
- Food and Snacks: Food services are limited to the Zion Lodge, so save time by packing your own meals and snacks. Nearby Springdale has places to load up before you get in the park
- Water: Zion can get really hot in the summer, so make sure to have water. Carry a reusable bottle or hydration pack: The park does not sell plastic water bottles, but has refilling stations across the park.
- Springdale Services: Just outside the park, Springdale features gas, restaurants and rental shops for gear such as bikes or Narrows equipment.
- Leave No Trace: Do your part to keep Zion wild and beautiful by leaving no trace of trash or damage Take a garbage bag and take back your trash, stay on the paths and respect wildlife/plants. Help keep the park nic for future users.
An Ideal 2-Day Zion National Park Itinerary
Day 1: Zion National Park Highlights (Angels Landing, Emerald Pools, Canyon Overlook)
Angels Landing
Start day 1 in Zion with one of the most classic hikes found within the park. A thrilling, yet difficult, challenge is the strenuous hike to Angels Landing along a narrow ridge with vertical drop-offs on both sides.
I had originally not expected to hike Angels Landing—we thought it sounded a little scary, and worried that maybe the trail was overrated. But, thanks to a change of plans in our schedule I finally put it on the agenda and boy-oh-boy am I glad that we did — it’s like no other!
This trail is not for the weak at heart! Yet for those who dare, the payoff is something like a heavenly landing pad that looked specially designed by angels. But be careful, as this climb is perilous. Intent is needed as many have lost their lives here.
If the thought of standing high in a pie may terrify you yes that makes sense. The hike ain’t for everybody and that’s perfectly okay to miss out. It was even the reason two friends I traveled with preferred not to ride. But making it to Scout’s Lookout still provides an incredible vista of Angels Landing and the valley floor beneath. And even when you are on the way up, it’s pretty cool to watch hikers using chains (my friend was able to see me hike all the way)
One, to avoid the crowds and two, because of the unbearable heat. But don’t forget, sunscreen and water.
Request for morning permits in order to maximize your day!
How to Secure a Permit for Angels Landing
Angels Landing became so popular that in 2022 the park began requiring permits to help combat crowding.
A permit is only required for the chain-assisted part of the trail, Scout Lookout to the summit. A permit is not needed to Scout’s Lookout only. I think this was done wisely as I remember how crowded the summit used to become.
Well, now of course this hike requires at least some prep work. On recreation permits, you can apply for gov through two options:
Permit (Seasonal): One must apply for a seasonal permit by lottery several months in advance of your visit. Application deadline — varies according to trip date. Each application costs $6 to submit (nonrefundable), and an applicant can include up to six people. In order, you can rank seven different favorite dates and times. If it works, they bill you an extra $3 per head (refundable if canceled inter alia).
Day-before Permit: failed at the seasonal permit, you can buy up to until one day before your hike. From 0:01 – 3 p.m. MST you will be able to apply, and at four your fate is revealed It operates under the same process and fees as a seasonal permit.
After you submit payment, print a confirmation that rangers may ask to see on your hike. Permit start time is based from the Grotto.
The Zion Park website has additional information.
Angels Landing: Quick Facts
- Distance: 5.4 miles roundtrip (3-5 hours)
- Difficulty: Strenuous
- Elevation Gain: 1,488 feet
- Shuttle Stop: The Grotto (#6)
Hiking to Scout’s Lookout
You can find the trailhead to Angels Landing at The Grotto (shuttle stop 6) which leads you over a bridge and provides gorgeous views as soon as it begins. You will quickly come to the initial series of switchbacks that begin your 1,100 foot ascent.
It is a relentless climb so I had to stop and get my breath back several times. Fortunately, the views get better as you climb higher.
Following this rigorous beginning, the trail continues through Refrigerator Canyon — a reprieve from all that uphill climbing with some cool shade. Thankfully, it is not long before you encounter Walter’s Wiggles—21 tight switchbacks that twist up the mountain. Unlike anything before, this was by far my weakest part and had me feeling like jelly legs at the end.
Literally, I am relieved when we hit Scout’s Lookout. Other hikers can be seen making their route to Angels Landing across the narrow ridge, stretching out from here. Another good place for views of the canyon is from here you can see in both directions giving a panoramic view.
Rest here for a while, have Some food and figure out if you want to go up towards the peak or should u return. At this point, most hikers that have not secured a permit or do not wish to undertake the final climb will remain.
Exploring Emerald Pools
Come Back to the Grotto after Scout’s Landing or Angels Landing The trail to Emerald Pools also begins from here, so consider this as a good sequel.
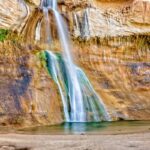
To be honest, Emerald Pools was not what I expected it to be though still one of the signature hikes at Zion. One thing that factored heavily into my experience is the dry year I visited, so not much of a waterfall to hike down. However, they suffer from a dearth of water in the dry summer months and then are uninspiring but during very wet seasons—typically spring or fall—the pools reportedly come to life. Pictures from that site in those seasons exhibit genuine emerald build water also cascading down including the steeping walls over it.
The Kayenta Trail to the Upper Emerald Pools Grotto –> The hike from the grotto, there is a trail that gets you right above (but not down in) and all around them. If you like, continue to Lower Emerald Pools (get back on the shuttle and exit at stop #5: Zion Lodge) but I found them disappointing so would not make a special trip.
Different angle of Upper Emerald Pools, shows green fluorescence even in less wet conditions For my visit, they dropped a small dribble of water from the 300-foot cliffs above but in wetter years this would be an exciting waterfall that I could not wait to see!
It was a real eye opener how big those cliffs are up close. It was difficult for me to get them all in one photo, so if you have your wide-angle lens definitely take it with!
The area of boulders and cliffs that punctuate this section also provide a respite from the sun so you can cool off in the shade near Twitchell Canyon, a fantastic spot for lunch or an afternoon snack.
Kayenta Trail to the Upper Emerald Pools, Short but Sweet as Day 1 of your Zion itinerary. 2.3 miles is a bit long; 300 feet total gain sounds about right and it takes an hour or so to hike this popular trail roundtrip.
Exploring Zion-Mt. Carmel Highway
Soak in the feeling of surrounding tranquility as you continue your hike to Emerald Pools and thereafter board a shuttle for heading towards Zion-Mt. Carmel Highway. No shuttles serve this area of the park and will only be able to access it via your vehicle.
The Zion-Mt. Carmel Highway viewscardIn addition to the hundreds of drivers who travel along Zion Canyon each day, millions more see its beauty from their cars on US 89 and SR-9 (known as the Zion-Mt.
So you start out driving up to the top of mountain and there are some very steep switchbacks going up. On the left you can see Great Arch and if you look carefully, there are people at the top: that is where Canyon Overlook also will happen next.
One of the more scenic parts is driving through Mount Carmel Tunnel. The tunnel itself is in darkness only pierced by the lights of our headlights and a few small clearings chiseled from outcroppings on either side that bring some light. The first time we passed through, it really took us by surprise how dark and in the middle of nowhere this place was!
Since the tunnel is so narrow, only one direction of traffic (at a time) is allowed to use it while oversized vehicles are within, which appears very regularly.
Sunset at Canyon Overlook
Once through the tunnel, you will hit your next canyon trailhead at Canyon Overlook. Parking is available on the right that gets filled quick, but you can park further down one of many overflow lots.
Canyon Overlook would henceforth be one of my all-time favorite spots in Zion as it was such a low impact view. Seeing the red rocks simply glowing a warm shade of gold at dusk makes this an extra magical experience.
The hike is a relatively short roundtrip two miles with an elevation gain of 163 feet. The trail has stair steps initiallyides down the rocks but then it flattens out. The trail is slickrock most of the way (don’t be like me and wear your Tom’s) so make sure to have good footwear. Water bars help to build the trail…these spots make sure that water drains off of it well and helps you find solid footing in a slippery situation! Just be weary, there are many exposed roots. And loose rocks along way as is typical Cascades hiking fashion…I bit it pretty easy on my ass descending so take note 🙂
The trail emerges at the bottom of a wide-open canyon floor with couch cushion-like rock formations. The view here is the closest thing to Angels Landing, because it gives you a canyon perspective without being as strenuous of an ascent. Canyon Overlook is still a memorable view even though the point of Angel Landing overlooks wider span.
Looking down on them from the overlook, those switchbacks you had just been driving up are sort of a trip to see! It is possible to do a sunset hike (getting back down before it gets dark), though I would recommend carrying a flashlight or collapsible lantern, just in case.
Dinner at MeMe’s Cafe
If you go out on a hike all day, chances are you’re going to build up an appetite so the next meal better be worth it. Springdale has plenty of good options outside the park, but one favorite is MeMe’s Cafe.
With the delicious food and cordial service, we ended up coming back here more than once! They open till 9pm so it’s good if you end up staying for a sunset viewing.
They offer a menu of burgers, sandwiches, and even crepes as well as a great selection of local beers on draft and wine — both perfect for after your ride!
Zion National Park Itinerary: Day 2 (The Narrows, Watchman Trail, Pa’rus Trail)
Riverside Walk + The Narrows
One of Zion’s best-known, signature hikes because the Taylor Creek and Canyon Overlook areas is The Narrows where you actually walk IN water downriver through tight place in the tall cliffs of Zion. Yes — you will really be hiking up the river!
That said, the Narrows is not always open. The park closes the control room when water levels are above 150 CFS, and it also can flash flood. Avoid hiking and getting rained on Be sure to get the latest conditions before heading out.
The other thing to be cautious of is blue-green algae in the water. Do not ever drink the water from this river, even when filtered and never put your head in it either. This is controlled through the park oil levels, if certain threshold are surpassed they will close off the hike. Always confirm the status of The Narrows before planning to go.
If however you score and the Narrows is open, this hike a must do! It is an unforgettable and certainly one of my favorite experiences in Zion. It is very special to walk in the river between such tall canyon walls.
Take the shuttle to last stop (#9 Temple of Sinawava) to start From here, take the Riverside Walk which is a flat paved walkway winding along the River. If you do not have it your heart to trek The Narrows, though which does get closed due to flooding this or previous years; the Riverside Walk is worth a purpose. The scenic 1-mile trail with jungle-like foliage and hanging gardens on the canyon walls, concluding where the river narrows to a point there are no shores backing it from either side. This is the beginning of The Narrows and in summer it can be crowded with bathers enjoying a cooling break.
At this point, the hike leads you head on into the river. The rocks beneath are often very slippery; footing is uneven and the stones can move, so I highly recommend a walking stick to go with your water shoes. Both of these items and a wet bag can be rented from Zion Outfitter located just outside the park.
The hike starts with shallow water about ankle high, but it slowly begins to deepen. A lot of the part you will be walking in knee-high water, but some parts are 3-4 feet deep. It is however dependent on the time of year and how well it has rained that season—I hear tales all the time from hikers who have had to walk with water up to their armpits!
The scenery gets even better as you go further into the canyon. It seemed I never went more than a few feet without taking time out to snap pictures of amazing rock walls as well crazy landscapes.
One of the great things about hiking in this canyon is that you can make it anything you want. The entire hike down stream is upwards of 9 miles long, but most hikers are heading for Wall Street which is about 2 miles in. At 20 feet wide, this is the most narrow section of Grand Canyon and here walls stretch straight up to more than 1,500 from river. I suggest to stop by Wall Street somewhere between 10 am and 3 pm when sunlight will wrapping the canyon during this time of day making it even more magical.
We went as far as Wall Street where everyone, including us, turns around. We spent the better part of 6 hours hiking up to this point and back down. For the more adventuress or those looking to make a longer day of hiking, you can keep on going until Orderville Canyon which is the far end of the trail.
Watchman Trail
If you have some extra time after the Narrows and want to hike something else short, The Watchman is a great one. You do not climb up to the top of The Watchman itself (one of the parks most iconic formations) however you hike into a viewpoint with awesome views.
The trail starts at the Visitors Center The first segment of the hike (from what I remember here below is not especially glorious), but with every feet you climb — that views continue to rise. In the springtime, wildflowers are in bloom throughout along the trail.
After ascending several hundred feet above the floor of this park, a viewpoint opens to spectacular views across the canyon toward The Watchman and other formations. You will also be rewarded with a majestic view of Springdale and the serene surroundings. At the end of the trail, there is a little loop that you can do if you want to get some more south-facing views.
The hike is moderate, but remember — there’s not a single solitary bit of shade along the way and temperatures can get quite toasty (summer be damned). The hike that we did was almost 100 degrees, and I had no idea how much of a beating it would be. We took our time, had lots of water and we still found it a real struggle in the heat so just give that some thought!
Pa’rus Trail and Canyon Junction Bridge for Sunset
More of a walk than an actual hike, the Pa’rus Trail is one of Zion’s easiest and lowest stress options. The 3 mile trail is paved and flat, so it’s a nice easy post 2-day Zion adventure part of your trip. The hike is about one hour in duration and runs from the Visitors Center to The Canyon Junction Bridge where often people go for sunset watching.
I had no idea about Pa’rus Trail, but while on the shuttle we saw these views beneath Canyon Junction that I said to myself if/when leaving Zion this was a must-do.
Canyon Junction Anchored by the looming Watchman in greenery with a backdrop of (in summer, at least) burnt red sandstone, this spot features a view of it all from where visitors may park near Zion’s south entrance. And this is even more enchanting as the sun begins to set, casting a golden wash of light over everything.
Please remember, the Canyon Junction Bridge is situated on a working road – so you may have to be quick should you choose this as your location. The more relaxed view from the trail or a nearby bank by means of the river as background For photo chances.
Dinner at Oscar’s Cafe
For the perfect ending to your time in Zion National Park, grab an excellent Mexican meal at Oscar’s Cafe!
The meal sizes here are huge and are great after a long day of hiking! I got the burrito that could easily be my arm They also dish some tasty tamales but we love their heavy hearty burgers.
Get there at a time of day when you can take your lunch on the patio and enjoy some sun. Otherwise, have dinner here and then head to the Pa’rus Trail at sunset (the perfect way to end a day in Zion).
Alternate Activities for Your 2 Days in Zion National Park
If some trails are closed or if the activities mentioned earlier don’t spark your interest, here are some alternative adventures in the Zion area:
- Observation Point (a great Angels Landing alternative) So instead of hiking this one first as we had planned, we ran out of time and landed here at Angels Landing. Observation Point will be slightly longer but is considerably less dangerous. At a higher elevation than Angels Landing, offers panoramic vistas that some might argue are even better. Observation Point via the Weeping Rock trailhead is closed due to rockfall, but you can hike it from the East Mesa Trail). (Conditions permitting, trail year-round.
- Hidden Canyon: One of the other alternatives to Angels Landing, at 2.5 miles round-trip with a steep elevation gain (1,000 feet) at least it’s relatively short! Not overly impressed with the hidden canyon itself, as much as it was pretty but kind of meh to being an over-hyped trail; however- the views were totally worth climbing that route! After that, there are a small portion with chains — which serve as a good way to get accustomed before heading up Angels Landing. ( Note: This is incidentally a trailhead going to Observation Point also closed due to rockfall. Check for updates.)
- Kolob Canyons — Situated approximately a 45-minute drive northwest from the park’s main area, these canyons offer phenomenal views along an easy going five-mile scenic byway and hiking trails. It is also much quieter than the main canyon. This was a flying visit, I would love to return and experience this properly.
- Scenic Helicopter Tour — Experience Zion from the sky with a breathtaking helicopter flight. Opt for a 10- or 20-minute flight to gain an aerial perspective that few other experiences can provide.
- East Zion Cliffs Sunset and Backcountry Off-Road Jeep Tour: Dive even further into the wilderness with a 4×4 backroads exploration of towering limestone canyons, slot-canyon paths, waterfalls etc. A rock formation hike that culminates with sunset photos in a private sunrise location (Haunted Canyon Rock Formations)
- East Zion White Mountain Horseback Tour: A guided horseback ride offering scenic views and a beautiful trail leading to the mouth of an isolated slot canyon. It is a short hike from there through the canyon which is all tall sandstone walls and beautiful.
Where to Stay in Zion National Park
The Zion area offers a variety of accommodations, ranging from luxury hotels and glamping sites to traditional camping. It’s important to book early, especially during peak months, as spots fill up quickly—especially within the park itself.
Here are some options for where to stay when visiting Zion:
Accommodation Inside the Park
- Camping: Zion has three campgrounds. Two (South Campground and Watchman Campground) are located within the main park area. The third, Lava Point Campground, is in the Kolob Canyon region, about an hour from the main area. You can book sites on Recreation.gov.
- Zion Lodge: The only lodge within the park, featuring 75 rooms, 6 suites, and 40 cabins. Staying here offers maximum convenience since you’re right in the heart of Zion. Be sure to reserve early, as it’s a popular choice.
Where to Stay in Springdale
If staying inside the park isn’t an option, Springdale is your next best bet. You can hop on the Zion shuttle in town, making park access easy.
- Desert Pearl Inn: Located just 0.8 miles from Zion’s entrance, this eco-friendly hotel features handcrafted Southwestern decor, a seasonal heated pool, and a hot tub.
- Zion Park Motel: Perfect for budget-conscious travelers, this motel offers amenities like a microwave, mini-fridge, heated pool, picnic area, and children’s playground.
Staying East of the Park (Mt. Carmel Highway/Kanab)
For those also planning to visit Bryce Canyon, staying east of Zion can be a strategic option.
- Zion Mountain Ranch: Located just outside the park’s eastern entrance, these upscale cabins are decorated in Southwestern or Native American styles and feature private porches and gas fireplaces. Some rooms offer saunas or massage services. The ranch even has its own buffalo herd.
- Canyons Boutique Hotel: A charming boutique hotel with a Victorian touch, featuring free breakfast and bike rentals. The recently renovated rooms add to the appeal.
Staying West of the Park (La Verkin/Hurricane)
If you’re looking for budget-friendly lodging near Zion, staying west of the park is a great option, with the south entrance just a 30-minute drive away.
- La Quinta Inn & Suites La Verkin: This modern hotel offers views of the Pine View Mountains and Zion. Rooms are basic but equipped with all necessities. Amenities include a pool, free breakfast, and a 24-hour gym.
- Wingate by Wyndham Hurricane: A newer hotel with modern amenities, including an outdoor pool, gym, and complimentary breakfast.
Glamping Near Zion National Park
For a unique and adventurous stay, consider glamping near Zion. These sites offer a blend of comfort and outdoor experience, allowing you to enjoy nature in style.
- Under Canvas Zion: Offering luxury tents with wooden floors, private decks, and wood stoves, this glamping site also features fire pits, hammocks, and yoga classes.
- AutoCamp Zion: Nestled along the Virgin River, this glamping spot offers Airstream trailers, cabins, and canvas tents. Each comes with a kitchenette, spa-like showers, and premium toiletries, providing a comfortable stay in the midst of Zion’s natural beauty.
Essential Tips for Planning Your Trip to Zion National Park
Getting to Zion National Park
- he closest airport is St. George Regional Airport (SGU), located 40 miles from Zion in the town of St. It’s just a small regional airport so there are really only very limited direct flights available.
- Near Las Vegas: Most visitors arrive at Harry Reid International Airport in Las Vegas (170 miles away). It also has many domestic and international links, as well as various leading car rental firms. Zion is approximately a 2.5–hour drive from Vegas on the I-15 N, then UT-9 to Springdale after you pick up your rental car ().
- Salt Lake City: You can also fly into the Salt Lake City International Airport (SLC), around 300 miles from Zion. You are looking at a 4.5-hour drive down the I-15 S and then UT-9 to Springdale if you decide on renting out a car.
- Bryce Canyon — Bryce is just 72 miles from Zion, making it a convenient day trip on the same visit. If driving, Monument Valley to Kanab will take about an hour via US-89 followed by UT-12 and then UT-9.
Park Entrances
Zion National Park has three main entrances, depending on your starting point:
- South Entrance — this is the entry point by Springdale; most popular. This is probably the access route if you’re arriving from St. George, Las Vegas and other southern/western locations. The Springdale shuttle also stops at this entrance.
- East Entrance: This entrance, located on the Mt. Carmel Highway (Hwy 9), is your best bet if you’re heading in from Kanab or Bryce Canyon.
- Kolob Canyons: A less populated entrance about 45 minutes to the northwest of the main canyon. If you are just on a short visit to Zion (2 days) then this entrance may be unnecessary.
Getting Around Zion National Park
Zion operates a shuttle system to reduce congestion and pollution, covering the Zion Scenic Drive and parts of Springdale. For most of the year, the shuttle is the only way to access many of the park’s main attractions.
- The shuttle is free and does not require a reservation.
- It services 9 stops within the park, taking about 45 minutes to travel from the first to the last stop.
- Be mindful of the shuttle schedule, as the last shuttle departs before sunset in summer, which might impact your plans.
It’s worth noting that the shuttle does not stop along the Mt. Carmel Highway, where Canyon Overlook is located.
Best Times to Visit Zion National Park
Spring: Late spring is generally the best time to visit Zion, as the weather isn’t too hot or cold. At this time water levels are so low one can normally access the Narrows. High water might still be an issue on some hikes, and early spring can even show up underdog chilly. Still, it’s a good time to view the grand pools and waterfalls that pat on themselves every day part of way for coming from santa rosa Emerald Pools task.
Summer: Most of the trails are accessible during summer, this is also when most families have time off with their kids and it can be so crowded. The heat in Zion Canyon becomes oppressive from late spring through early fall (May to September) which isn’t ideal for long hikes but great if you only want to take a short walk! This obviously depends on where abouts your planning on staying as there’s other areas here that will have significant less people all year round yet offer stunning scenery too. But there are days where it gets up to near 100°F, and the park does get more in the way of afternoon thunderstorms with rain-washed roads or quick flash flooding. Expect more crowds, higher prices of stay and activities so make your bookings well in advance.
Autumn (Fall): Autumn is the next best season to visit Zion. While the days are shorter and cooler temperatures deter some from going out for a hike, this has an upside as well. Yet if you are looking to hike the Narrows, expect ice-cold water.
Winter: If you are in search of solitude, the serenity that Zion provides is unforgettable during winter. Advisedly wear icespikes and be attendant to trail closures from snow. Angels Landing is a no go during this season of the year as it turns icy and can become quite treacherous.
What to Pack for Zion National Park
- Light weight: A temperature proof system you can wield in wind or rain for the warmer months or a small puffer on cooler.
- Sturdy Hiking Shoes: Good hiking shoes with great grip are essential, especially for more difficult trails such as Angels Landing. Check out this inexpensive but reliable pair from Columbia that will keep you comfortable and last a long time.
- Backpack — You can never go wrong with a good backpack to take all of your stuff, snacks and camera gear. Choose one that has space for a water bladder so you can keep hydrated. Perfect for hiking, that is my REI Trail Backpack that I got not so long ago.
- Water: Bring plenty of water! The hose, sipping-delivery method of a hydration bladder is plainly better for drinking while moving than even the best bottles.
- If you are going to be walking near sunset, the last thing you want is for nightfall while your still stuck out in the middle of nowhere. A collapsible lantern my friend brought, which she loved so much I got one for myself.
- Hiking Poles — Useful on harder trails and downright required for The Narrows. Pick one that can be folded up so you could store it easily.
- Water shoes with good grip are a must for walking on slippery rock in the Narrows A wet bag Recommended along w/ the waterproof bag and this pair.
- Now we have Battery Pack: A portable battery pack is an essential item required to keep your devices charged during those long hikes.
- To get you started, one essential in any campervan packing list is the First Aid Kit — always better to be safe than sorry!
- Invest in snacks: I keep protein bars with me to avoid hitting the drive thru for food. These are perfect for long hike days and my go-to is always Think Bars.
- 6- Sunglasses: The sun is strong, be sure to pack a nice pair of polarized sunglasses. I so love my Goodr sunglasses.
- Sunscreen – Keep your skin safe with a moderate to high SPF. This is the sunscreen I wear to cover my entire body and this one is for face, which I love.